Thursday, May 29, 2014

App-tastic Explorations in STEAM Showcase

When you say "Science Fair", many Science teachers cringe.  Either projects are created and planned out so they can be done in class, or they are sent home as homework for a month or so.  So often, the projects are hastily thrown together at the last minute (was that due today?!?!) or, even worse, are beautifully crafted by the parents (who is in school?).  We like to do things differently.  Rather than having a Science Fair, we have been doing a STEAM Fair for the past few years.

A couple of weeks ago, I was really excited when discussing our STEAM showcase this year.  We were all ready to go, with lots of 'Evergreen' apps (I just learned this term this week, which means an app that can be used across subject areas, not just an app for a particular topic) including PicCollage, Tellagami, and Aurasma.  Then, the lightning hit.  Yes, a bolt of lightning hit our school, and it totally messed up our technology.  Our WiFi was out for over a week (while we waited for new parts).  So, the STEAM Showcase was rescheduled.  And It.Was.Awesome!

Here are some pictures of the projects on display:


This is from our engineering class.  The students used Kinex to create a self-propelled vehicle.  As they created the car, they took pictures.  Then, they took a video of the car actually moving by itself.  Then, they imported the pictures and the video into Animoto, added text and created a movie of how to make a self-propelled car.  Very cool!


This project was done by a high school science class.  The app was called Nova, and it pretty much breaks down the periodic table of elements.  Using the app, you are able to 'build' different elements using protons, neutrons, and electrons.  There is sometimes a video related to the element.  Students from the class took turns asking students visiting the fair questions about elements, and they had to use the app to find the answer.


These next projects were done in middle school science.  This project was all about photosynthesis.  After creating a graphic organizer, students created a Thinglink that linked to pictures, videos and information about photosynthesis.


This student used PicCollage to create examples of refraction and reflection.


This student used Tellagami to create a video explaining the water (hydrologic) cycle.

All in all, I was very impressed.  All of these projects were done in class (usually as an assessment at the end of a unit) by the students.  The best thing is, technology wasn't what was done, but a product using technology that ensured students were explaining what they learned.  I hope next year more teachers are involved:)

Have you ever used any of these apps?  

Saturday, May 24, 2014

Managing the Digital Classroom - Using Document Cameras

This chapter focused on using the document camera to enhance instruction.  Full disclosure, I never once used a document camera in my classroom.  Sure, our school got a document camera that looked much like this:

Our technology leaders demonstrated it to teachers, explained how cool it would be to share examples of good work our students have done, show a science experiment so everyone can see (and include more than the students closest to the experiment), or demonstrate how to use a particular math manipulative.

At the time, I was feeling overwhelmed [like most teachers], and really didn't see it being of much use to me.  Teaching special needs students, we had very small groups of students working on the same thing (in a classroom of 8 students, I usually had at least 3 different activities going at the same time, so I never had a group of more than 4 students, and it was easy to share good work in a group of 4!).  The one day I intended to use our school document camera to demonstrate how to use our new geoboards and create polygons, our technology coordinator was absent and I didn't have any access to the camera (poor planning on my part).

So this chapter was short,  but it had some good, useful, easy-to-implement ideas of how to use a document camera.  Annotating authentic text was my favorite idea.  Especially when paired with a SmartBoard, teachers could find articles related to whatever the topic was, place the article under the document camera, and use the floating ink tool (which comes with the Smart Notebook software) to highlight, underline, draw arrows, etc. all over the article.  Then, take a picture with your screenshot tool and link to your class website, print it out, hang it in the classroom, etc.  I love when teachers take the time to show students there is a purpose behind learning about _____, other than just because it is included in the curriculum for their grade.

I also like the idea of using the document camera to demonstrate handwriting.  I am now teaching my four-year-old son how to write his letters.  In a 1:1 situation, it is sometimes hard for him to see exactly how I am holding my pencil, and where to start and finish on the letters.  He has also has already gotten into some pretty bad habits with writing letters (for example, when writing an n, he makes an upside down 'u', then adds the 'tail' on top).  I can see how it would be really tough for a kindergarden or 1st grade teacher to teach proper letter formation to 30+ tiny people all at the same time.  That is where a document camera might come in really handy.

Do you have a document camera in your classroom?  Have you ever used one?


Thursday, May 22, 2014

Managing the Digital Classroom: Flipped Learning

This chapter was all about flipped learning, and I'm a HUGE fan of it!  As a special education teacher in an inclusion school, I was out of my classroom all.the.time.  Seriously!  Whether it was to attend IEP meetings, test students to write an IEP, state testing, field trips, or sick babies (hey, I'm human and my own kids get sick sometimes), it seemed like I was never in my classroom (especially in the spring time).  
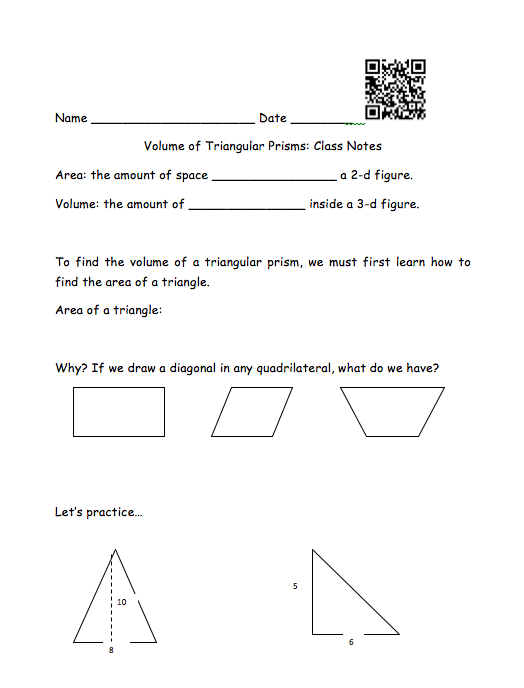
So one day I thought it might be better if I could create a video of myself explaining a concept that the students could simply watch.  My kids have a really hard time taking notes and writing down only the important stuff.  So I created a notes outline, so the students only have to fill in the blanks.  Here is an example:


Once I created the notes, I would literally take a picture using the camera on my iPad and import the picture into the app ShowMe (you can view my video here, if you would like).  I could then record my voice and the penstrokes on the screen and my students could hear me explaining the concepts.  To make sure everyone had access, I would go to the ShowMe website and create a QR code of my video and stick the code in the upper corner of the notes.  My students loved that I could be there explaining problems without actually being there.  The best compliments I got were from parents who loved being able to hear my explanations at home (by scanning the QR code), and they could actually help their kids with the homework!!!  (Many parents get very anxious when it comes to math when children enter middle school - I have no idea why?!?)

Now, there are many new ways to create flipped learning videos.  New software such as Touchcast and Voice Thread have been created to simplify creating videos.  The most difficult part would be making sure students have access to the technology at home to watch the videos.  I never used the videos in this way because while most of my students did have computers or tablets at their disposal, many didn't, and I didn't think it was right to have some students not able to do homework because of their circumstances.  The actual videos are usually around 5 minutes long, so it didn't take much time out of class and I was able to work 1:1 with students that I could see clearly didn't understand the concept.

Have you ever tried flipped learning in your classroom?

Sunday, May 18, 2014

Managing the Digital Classroom: SmartBoards in the Classroom

I'm going to start off by saying I am a little disappointed in this book so far.  Perhaps it is because I've been using technology in the classroom the entire time I have been teaching (I know that 31 isn't old... and I've only been in the classroom for 8 years), but I went from creating note outlines to share on the overhead to creating interactive SmartNotebook documents to project onto my Smartboard all within my first year of teaching!

I remember when I first got my SmartBoard.  I was angry. I was stressed.  I was frustrated.  I complained to my husband that I didn't have time to learn how to use this thing, and I had too much to do to figure it out.  Let's just say this was his reaction:


Once I was done complaining, I realized I needed some help. Since I was among the first to get a board, I didn't really have anyone in my school to train me.  Of course, my school provided training [a SMART trainer came to our school and demonstrated how to use the software], and even sent us to an off-site training to learn from teachers who uses SmartBoards.  Training was great, but I was left along [a lot!] to figure stuff out.

I started slowly, at the SmartExchange.  I would download lessons other teachers created.  Sometimes, they were fine and I used them the way they were.  Other times, I would delete a slide or add another slide to add extra practice problems [I teach special needs students, so we need LOTS of practice].

Simply by downloading and using the documents others have created, I was able to learn their tricks. I learned about how important it was to group and lock images.  I learned about cloning versus infinite cloning.  I learned about going to the properties and and adding animation.  Little.baby.steps.
Now, I would say I'm one of the most experienced in my school with SmartNotebook and I'm really comfortable using all of the features (did you know that if you use the magic pen, you can zoom in if you draw a rectangle around something, and you can create a spotlight if you draw a circle around something?).

But I digress...back to the book!

The first two chapters were about setting your classroom up around your board and incorporating the board into everyday routines.

In my classroom, I found it easier for students to interact with the board if they weren't at their desks. Something about the desk made it take so.much.longer to get up to the board and do what was asked. I usually tried having them move their chairs up closer to the board (I am lucky that most classes only had 8 kids, so that wasn't too difficult to get them around the board).


I think using the board for everyday routines is a great idea.  I actually didn't do this enough.  It talked about using the board for a quick exit ticket, having students choose if they really get it (green light), almost get it (yellow light) or really don't get it (red light).  So much faster (and definitely 'greener') than using little slips of paper!

I also liked the idea of using the timers more often.  When working on the warm-up, I frequently used  the firecracker timer and my students LOVED IT.  You would think the added stress of waiting for the explosion to happen would hinder their work, but it didn't:)

What is your favorite thing to do on the SmartBoard?

Friday, May 16, 2014

Technology Thinglink

I shared a picture of my Thinglink a few weeks ago, and now, I've finally completed it!


I can't wait to share this with my administration!  I hope this will encourage staff members to step outside of the box and try a new app (or 3) in their classrooms.

There are so many different apps to choose from, even if you are trying to achieve a certain goal.  For example, if you are trying to have students explain something, they could use Puppet Pals, ShowMe, Educreations, Blabberize, etc.  They all end up with the same result, and only have slightly different ways of getting there.  Depending on if you want students to use different background, import pictures, or record their own voices, you choose which app will work best for your project.

Have you used any of these apps?  Which is your favorite?

Friday, May 9, 2014

Managing the Digital Classroom - A Book Study

I recently purchased a fantastic resource: Managing the Digital Classroom.  Here is the link to purchase it from amazon.com.

Although I haven't read it yet, I can already tell that it will be a great resource.  Each chapter is devoted to a different technological device:
Chapter 1: Setting Up
Chapter 2: Interactive Whiteboard
Chapter 3: Document Cameras
Chapter 4: Flipped Classroom (I'm especially excited about this one:))
Chapter 5: Mobile Devices and Tablets
Chapter 6: Communicating and Collaborating
Chapter 7: Social Media

I have been using technology in the classroom for a number of years now.  I was among the first in my school to get a SmartBoard (I just happened to have a meeting with our director the day she met with the SmartBoard company).  I have always been a huge advocate for using technology whenever possible, not only because it can and does make life easier, but because technology tools are how you grab the attention of our students today.

Rather than simply reading as fast as possible, I'm going to take my time and reflect over the chapters.  I'll review a chapter each week, much like a book study.  If you would like, you are more than welcome to join me.  I'd love some feedback and to throw some ideas around with other people! Has anyone else read this?

Wednesday, May 7, 2014

App-tastic Explorations in STEAM


Our school has been implementing a STEAM initiative for about 3 years now.  Rather than a traditional science fair, our school last year started creating a STEAM fair, to include Technology, Engineering, Art and Math to the fair.  All of the teachers of these subjects were invited to submit projects to the fair.  It was a smashing success.  However, many of the teachers (myself included) neglected the technology part of the fair (I did have my students create tessellating patterns using paper and pencil) however, in retrospect, I should have had a technology aspect to it.
This year, we have decided to have an "App-tastic Explorations in STEAM" fair.  All of the teachers are going to be using iPads to display projects they have been using in class.  I have been working closely with our science teacher to use a few different apps with her students in preparation for the fair.

Some students are going to be using Thinglink to explain the water cycle.  They are going to find a picture, then include links and explanations about condensation, evaporation, and precipitation.

Another group of students are using PicCollage to demonstrate the difference between renewable and non-renewable resources.  


The last group of students is using the Tellagami app on the iPad.  I am hoping once they get the avatars created, they will do a little app smashing (using multiple apps on the iPad to create a project) and use Thinglink to link their Gami's!

I'm planning on taking lots of pictures on Friday and sharing some of the app-tastic explorations with you!


Sunday, May 4, 2014

3D Printers

Yesterday I had the pleasure of attending the Daly Showcase.  One of the vendors was MakerBot with their Replicator2.  How awesome does this look?


All of those gadgets around it were made on the 3D printer!  I was amazed!  The guy demonstrating was telling me about how many of the schools in New York (where the company is based) have seamlessly integrated 3D technology into their STEM programs.

Here are some more of the cool things they had:


Yes, that is a plastic chain link that really works!

I have no idea what this is, but it is pretty cool (and it was huge!  About 10 inches tall!).


How cute is that little pig?  

I would love to hear about how schools are incorporating 3D printer technology into their classes.  I would like to try and get one for our school next year, but I worry about the technicalities.  How difficult are the printers to get set up?  How difficult is the software to learn how to use?  What kind of creation software is being used the most?  The guy that was demonstrating this explained how students don't even need to design their own things, they can simply use thingiverse.com to find designs that others have already created.  But, I would prefer our students to design their own things. Right now, our technology classes use Sketchup to make computer designs, but I know there is probably something better.